
Extending Power BI's reporting capabilities with the Power Platform
How to Export data from Power BI using a button with Power automate

In this post I'm going to show I how to create a button in Power BI that takes a snapshot of the data from a visual and exports it to an external facing SharePoint site.
The problem
Why did I need to do this?
A client I was working for wanted to share some of their data publicly with their customers. They had a nice Power BI report that they already shared publicly and wanted to use that. By "shared publicly" I mean that the data was not private/sensitive and they had used the (publish to Web) feature on the report which was fine but also meant that it was not possible for users to "export" any data from the public report.
Caveat is that by default, they could have shared the report internally with their customers through other means but :
1. they had a lot of customers, circa 10,000 and not all of them had a Microsoft account to access the report internally and
2. many of their customers didn't have a Microsoft account and the ones that did, didn't want the hassle of having to log into it just to access this data.
Another benefit would be that their customers would be able to take the data away and perform their own analysis in their own time etc.
The 3 way solution
So I needed to create a solution that would enable users to download an up to date snapshot of the report's data without needing to have and log into a Microsoft account.
I used dummy data in my solution with Power BI, Power Automate & SharePoint working together to get the final result. Here's how the solution works...
Use Power BI to create the query for the data
Use Power Automate to extract the data & build the CSV file
Use a SharePoint location to host/store the data
Use Power BI to create the query
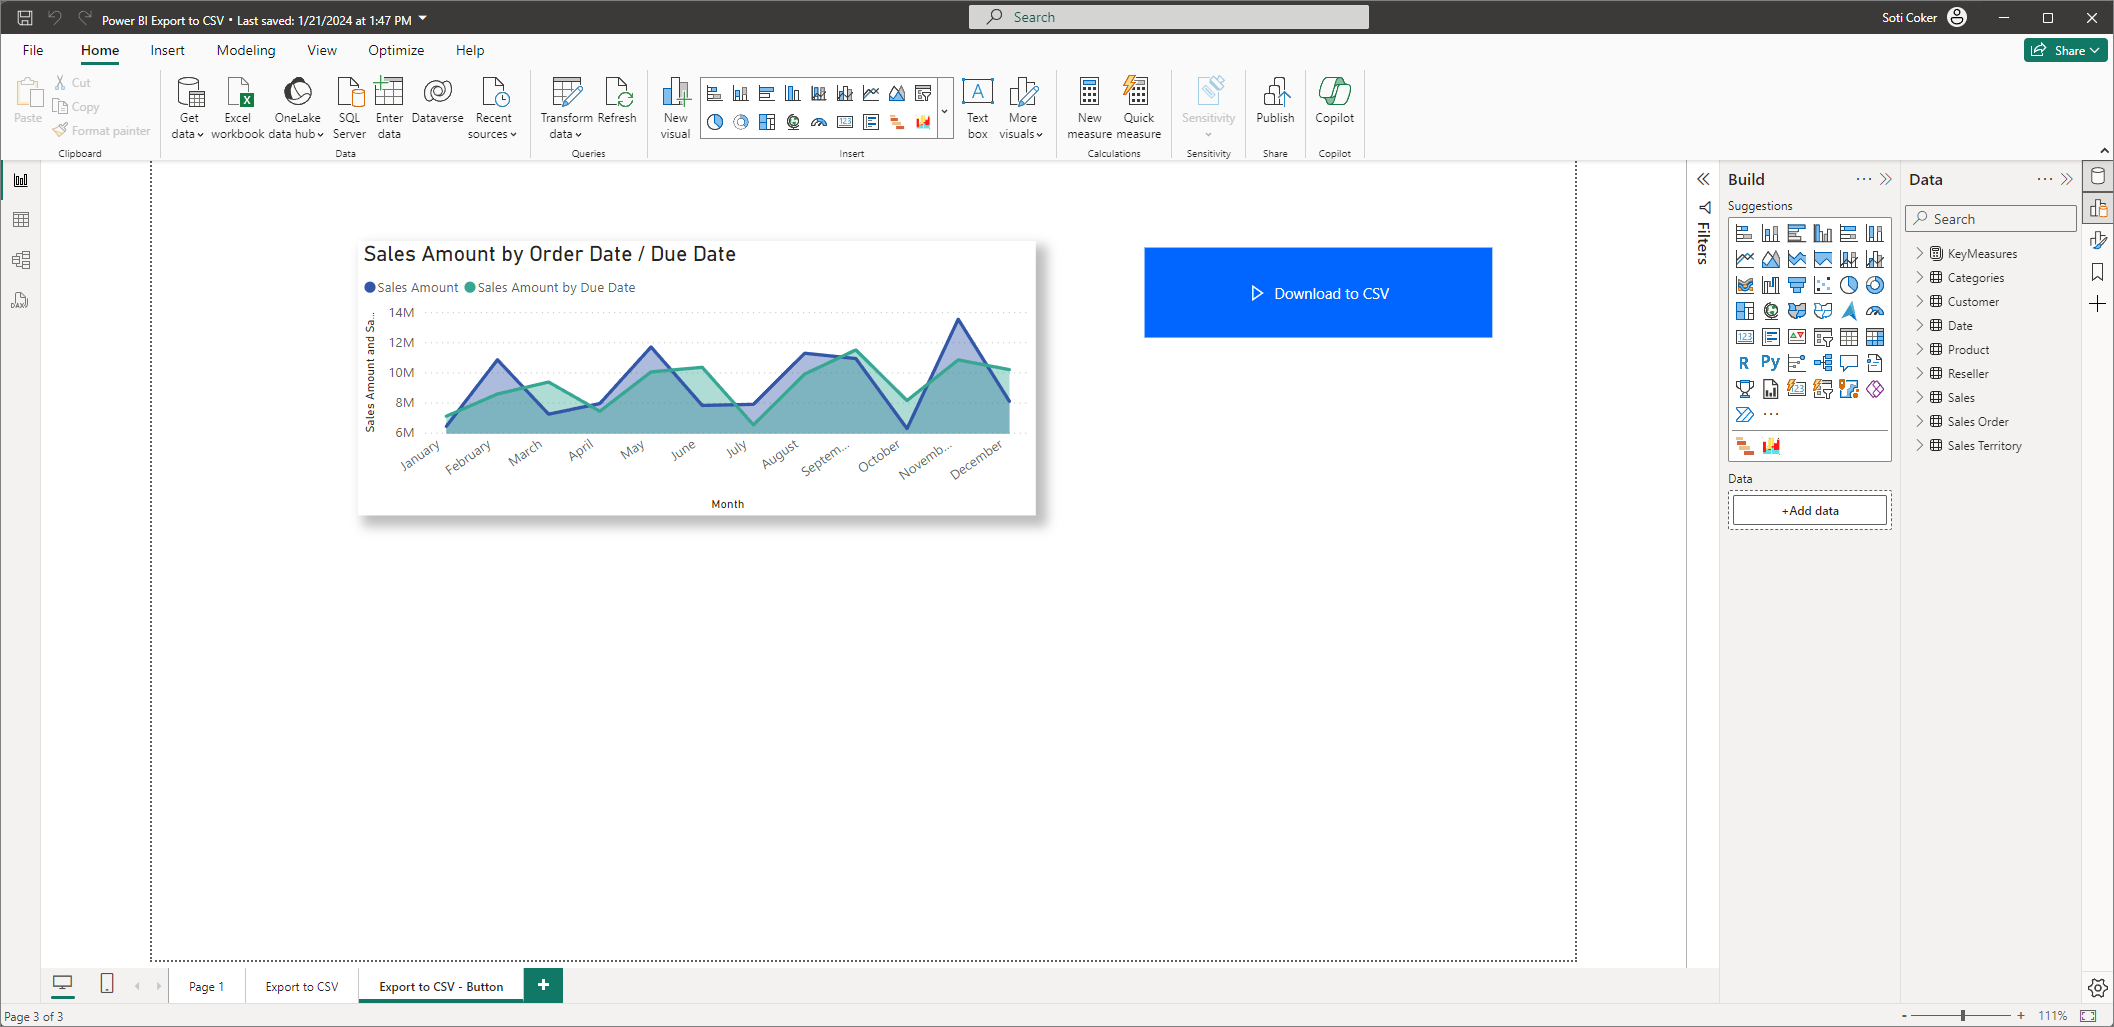
I'm using Microsoft's sample database AdventureWorks for this task and the first thing I needed to do was to make sure that I had already published the report to the Power BI service. This is because the dataset would need to already be in the cloud so that Power Automate can connect to it.
We need to to create the Dax query. At this point I could write the Dax query myself, but why do that when I can take the easy road and use the Power
BI performance analyser to write the query for me!
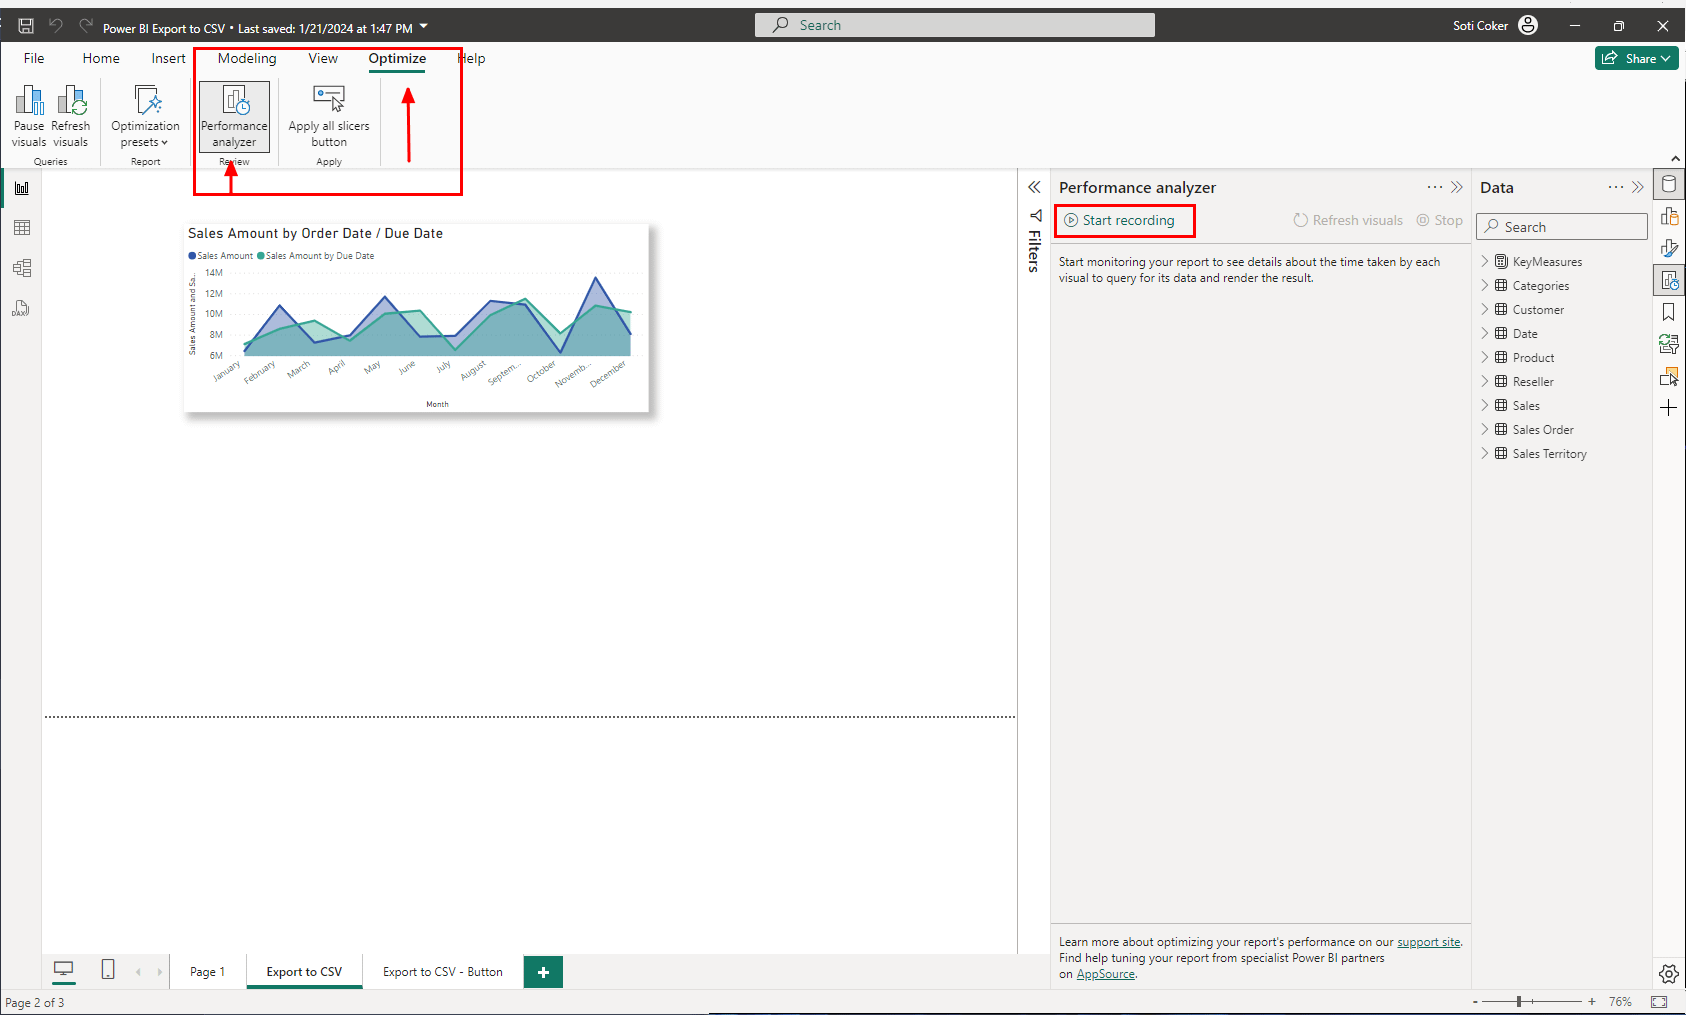
Performance analyser
The Performance analyser is under the Optimise ribbon so click on that, and then click on the performance analyser icon.
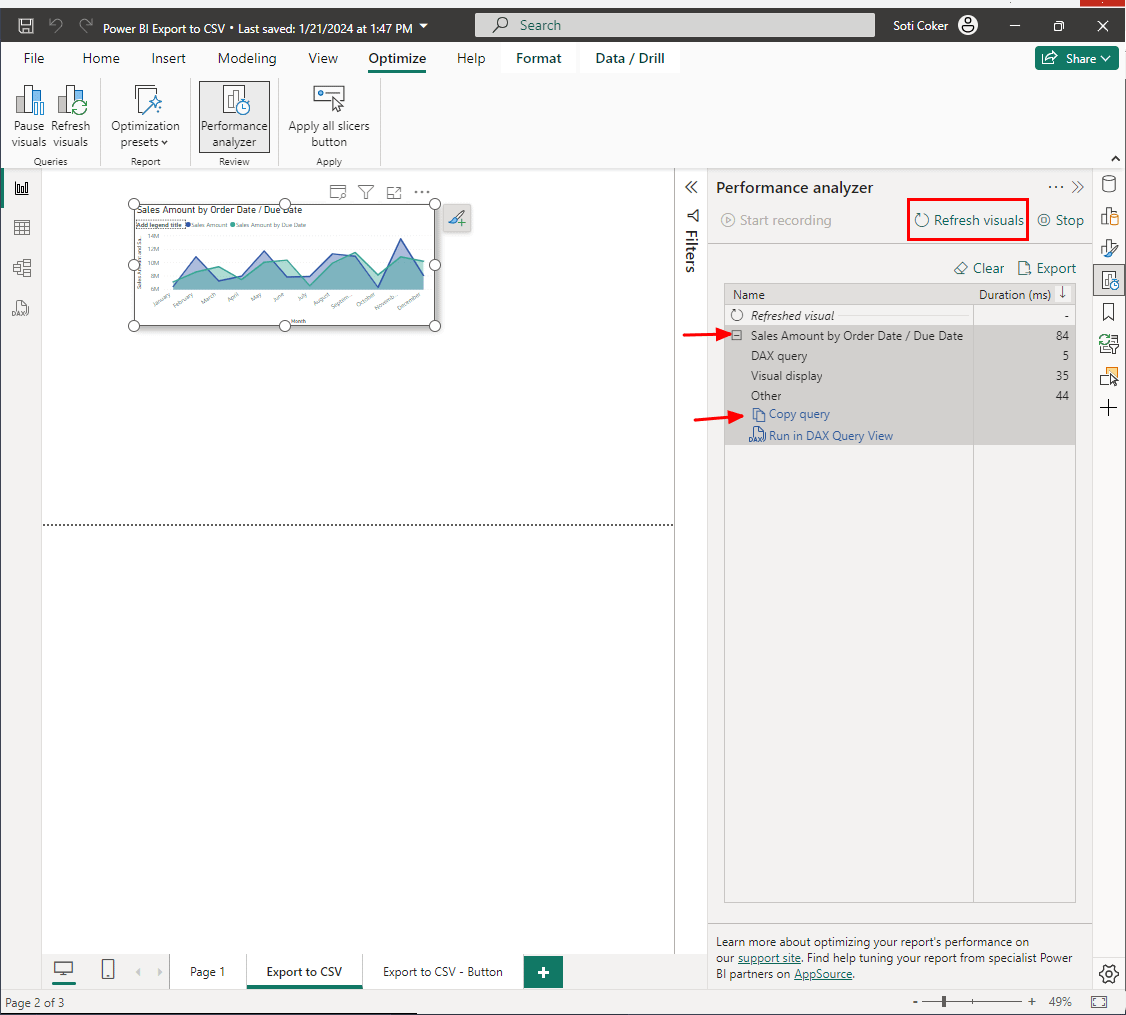
When you're ready,
Click the "Refresh Visuals" button on the performance analyser panel.
Click this cross next to the name of the relevant visual, in my case it's "Sales amount by order date/to date", then
Click the copy query button
I then stored and saved the query in a text editor because I would need it later on.
Automate the workflow
Next I used Power Automate to extract the data from the Power BI report, build the file and move it to the SharePoint location.
Here's an overview of the different Power Automate :
Create button to trigger the flow
Run query against the dataset
Create the CSV file
Create button to trigger the flow
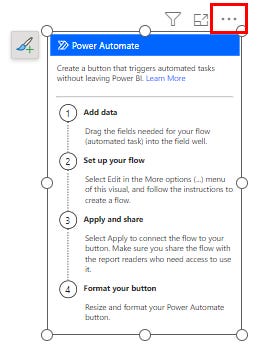
I created the button to kick off the whole process by clicking on the "Power Automate for Power BI" visual icon. This will place a Power Automate object on the canvas. I then linked this object to my Power Automate for by clicking on the three dots on the top right hand corner and choosing the edit option.
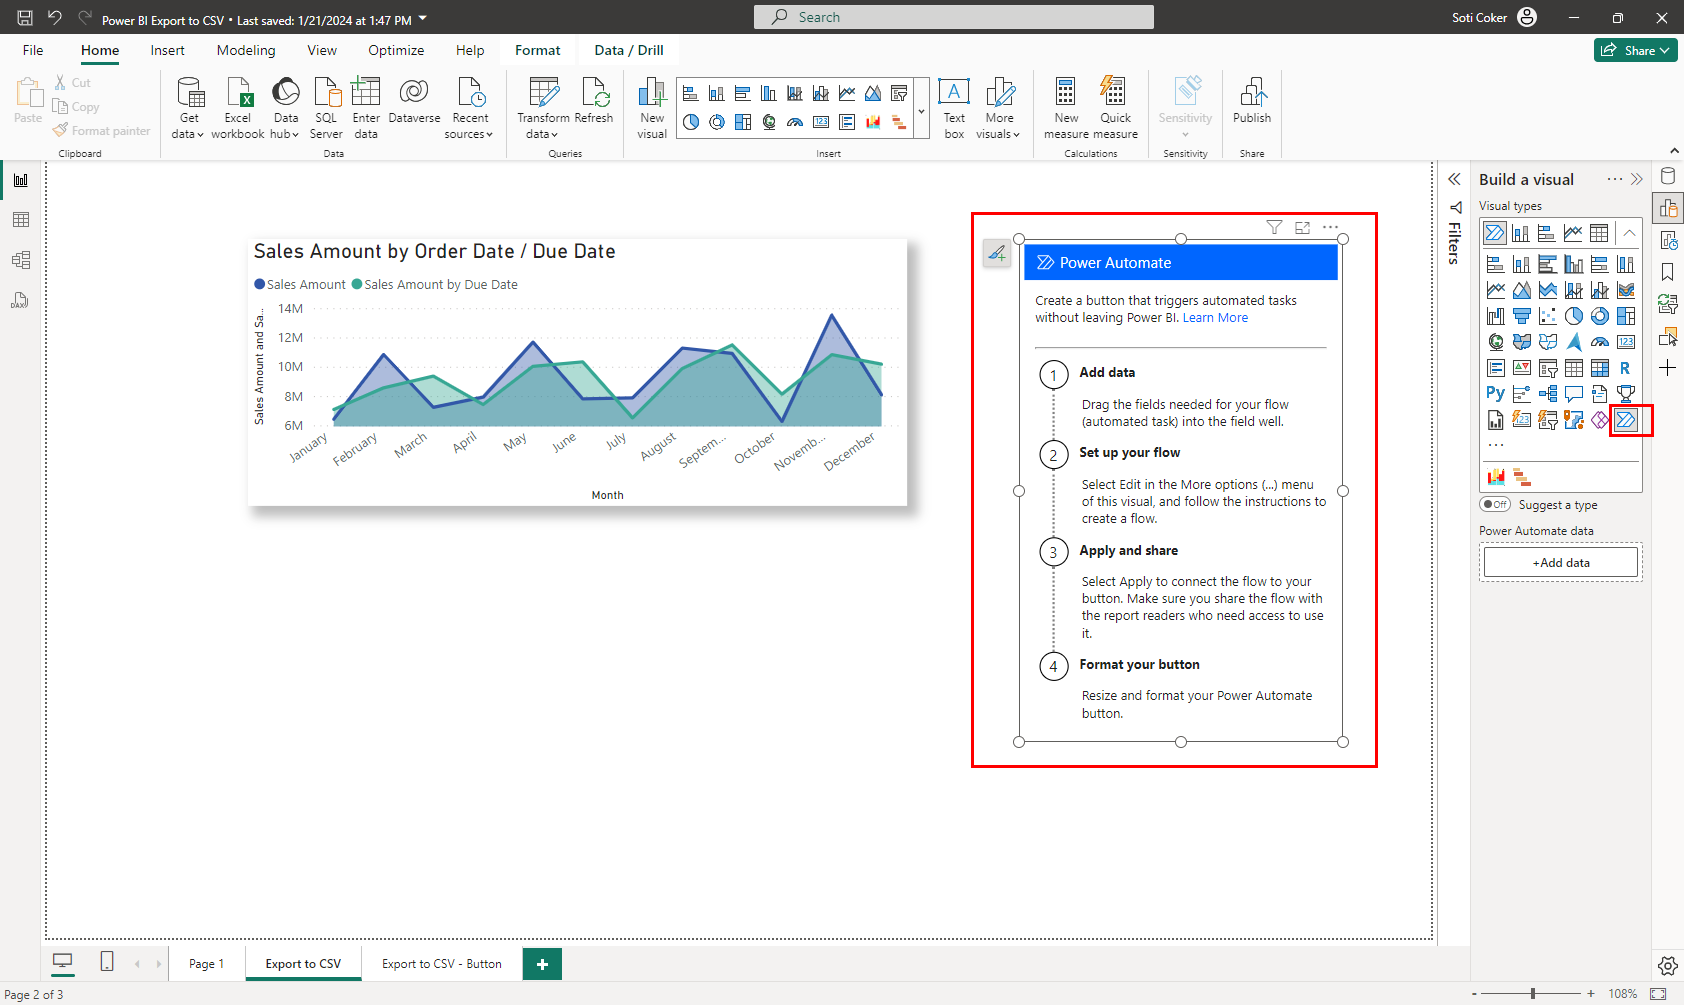
Click on the three dots in the top right-hand corner to launch the integrated Power Automate studio.
Then click on "New" button.
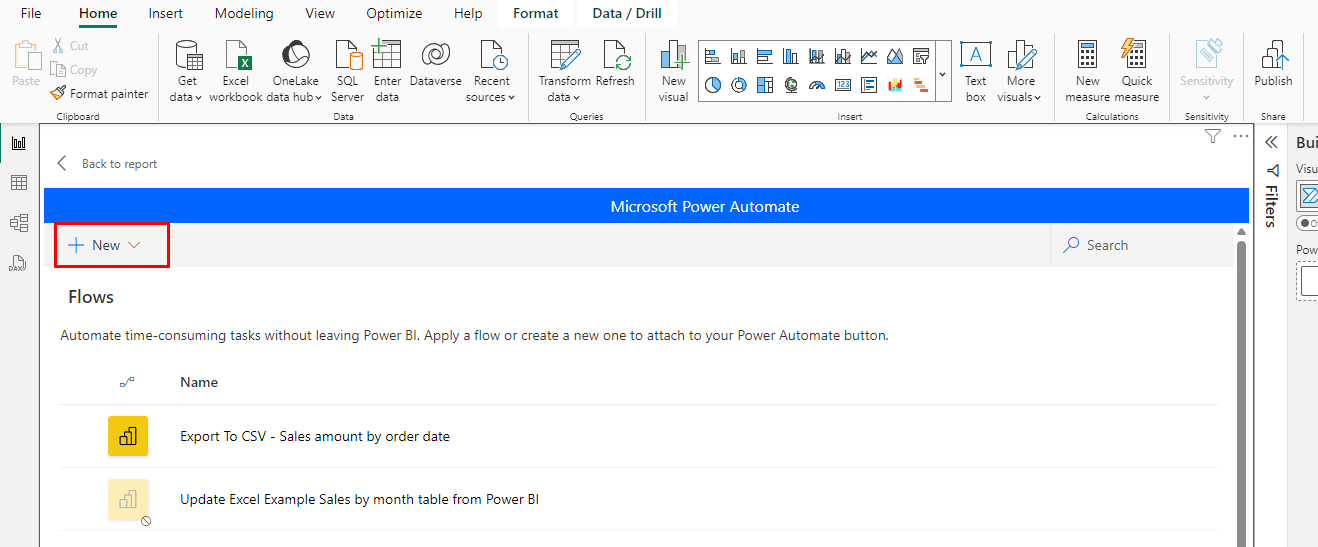
Choose instant cloud flow as the next option.
You should now have an object on your page called "Power BI button clicked".
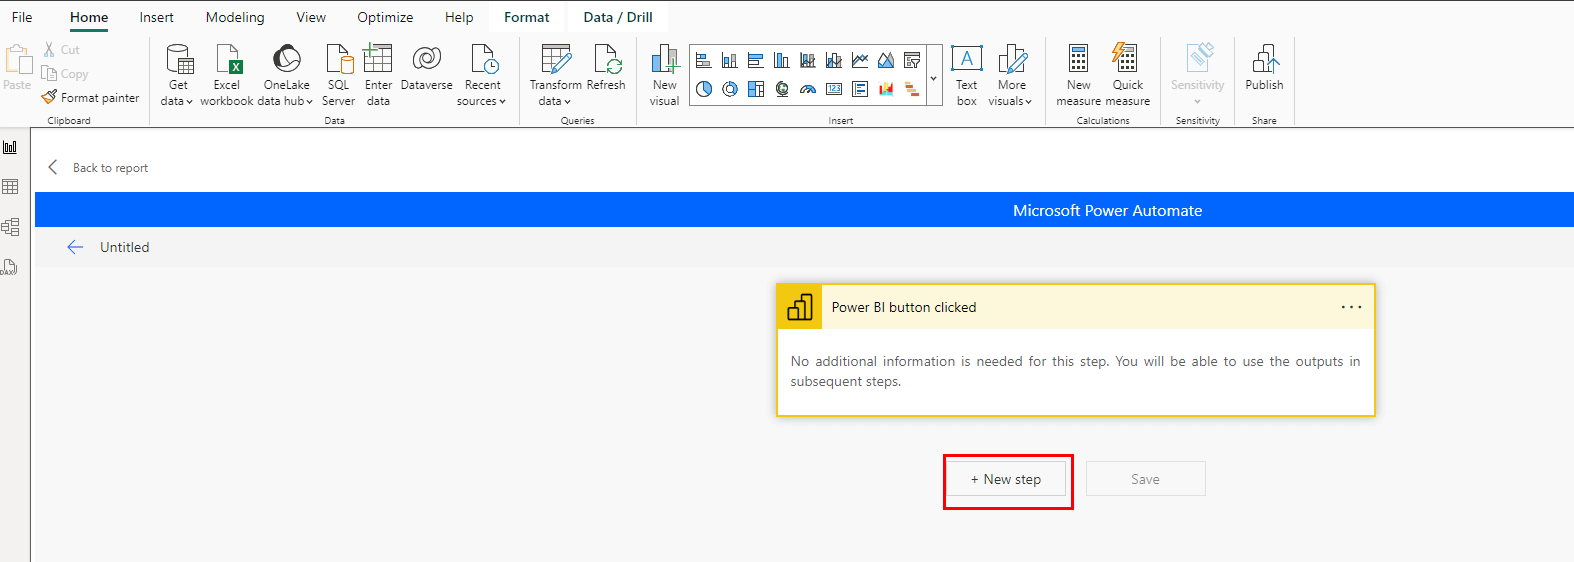
Next click the "New step" button that's just below that and choose the option called "Run a query against the dataset". There are a few parameters we need to fill in here, namely the workspace, dataset and query(Dax) text. I copied and pasted The Dax query from earlier into the query text box.
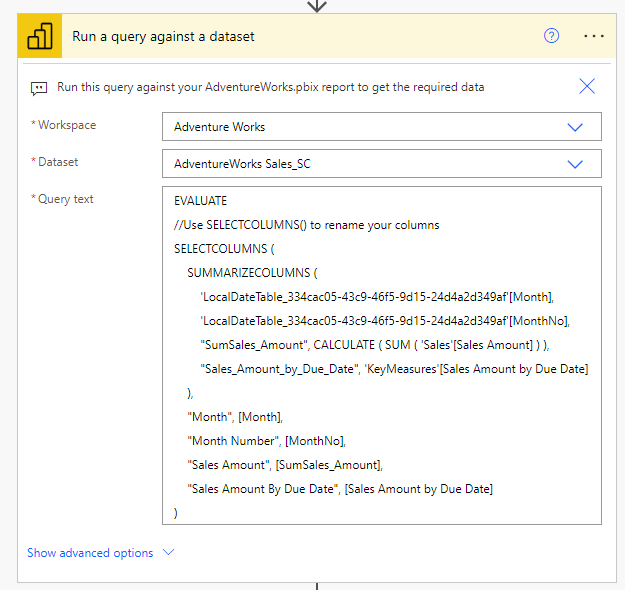
Great! The next two steps I'm going to describe are optional so you don't have to do them but I recommended them as it makes for a much cleaner solution.
Next I created a step to retrieve all the CSV files in the SharePoint location, why? This is because I only ever wanted there to be one file at this location. This makes it much easier for users as they won't have to figure out which file is the most up-to-date one etc.
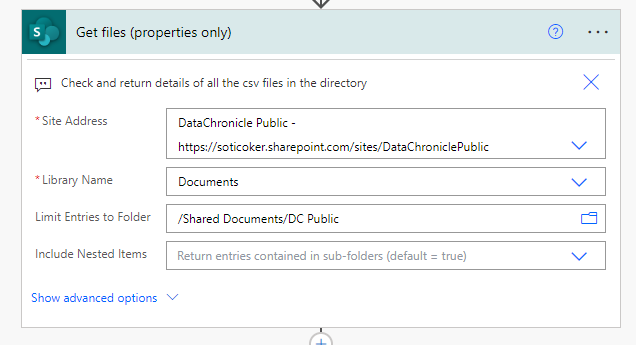
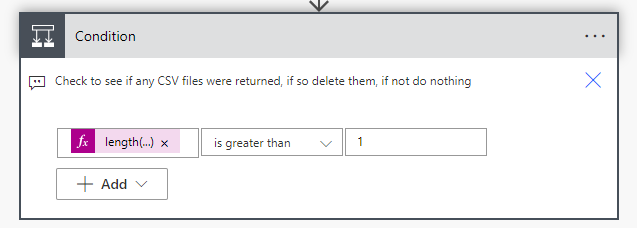
Next I created a condition step to check if any files were already present in the directory. if true, the step would return 1.
length(outputs('Get_files_(properties_only)')?['body/value'])
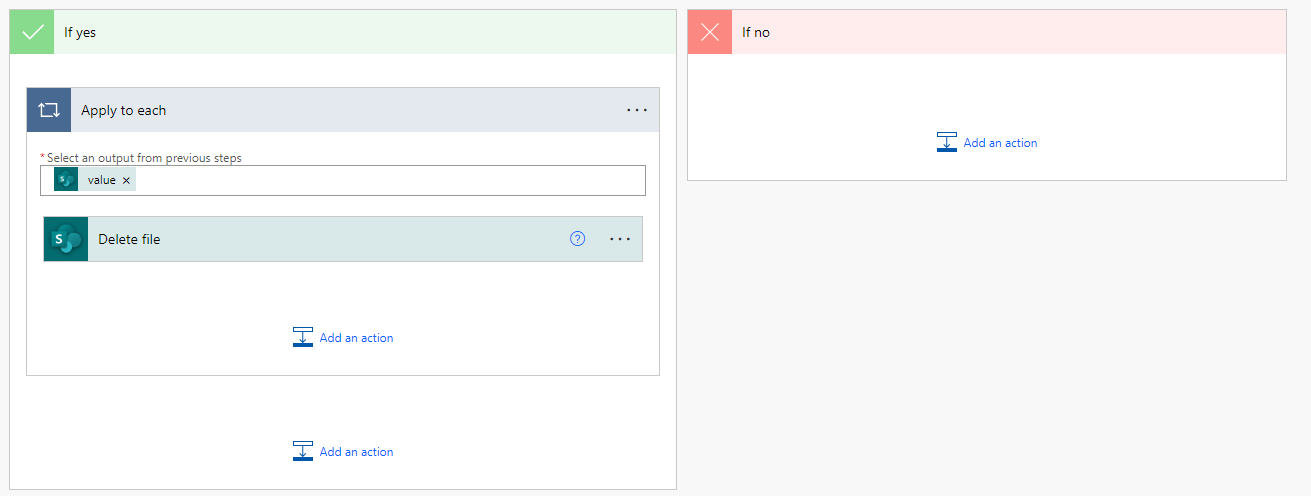
Then on the yes side of the condition, I inserted the SharePoint delete file function. When you do this, Power Automate automatically encases your Delete file function in an ""Apply to each" function just in case there are multiple files that need to be deleted.
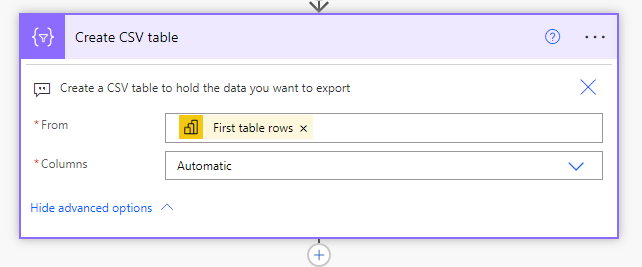
The create CSV table step, it is necessary one that you need to take to hold the data that you want to export. In the from field in the step, make sure to choose the "First table rows" dynamic content object.
Previously, I had experimented with outputting the data to Excel. Seems logical however working with Excel in Power automate has many more shortcomings. E.g. there is a maximum number of rows you can output, is also a painfully slow process to complete when you have thousands of records to output.
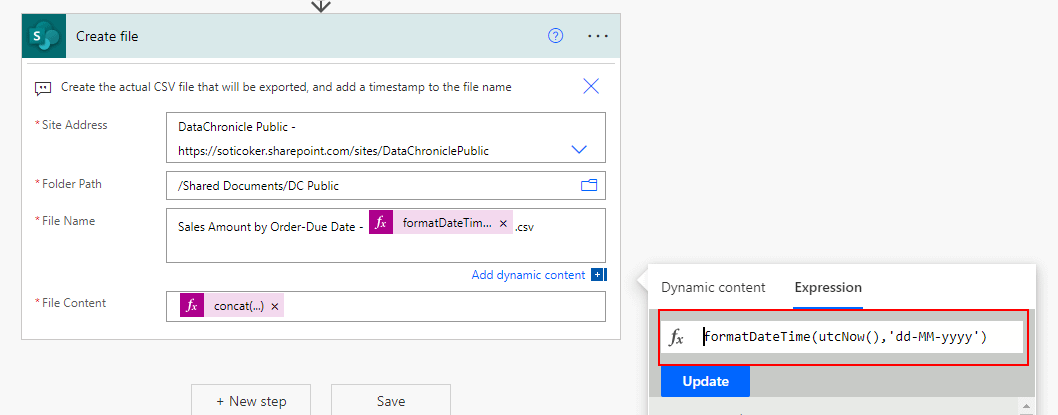
The final step in the processes that create file one. This is the step that actually creates the CSV file. The Site address and folder path fields are self-explanatory, however I wanted to add a timestamp to the name of the file to the user will know exactly when the file was generated. I had to use an expression to do this. Note I was also able to format the date the way I liked using this expression, formatDateTime(utcNow(),'dd-MM-yyyy').
Windows systems and text files
I was getting an error message at this point, and unfortunately I can't remember exactly what it was. However, some googling later led me to this solution. I believe it had to do with the fact that Windows systems, don't automatically recognise text files. And even though we had created a CSV(text file), the final output still needs this code adding to the top of the actual file else it won't work!
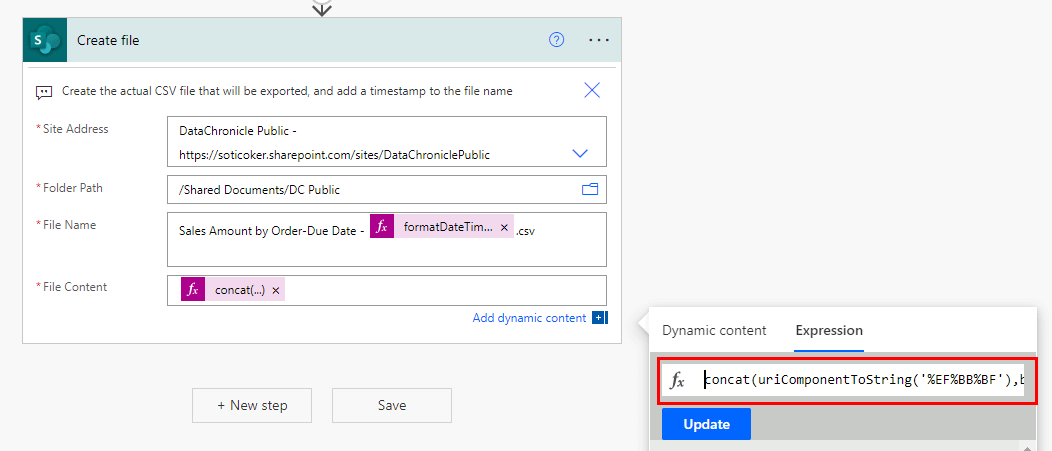
concat(uriComponentToString('%EF%BB%BF'),body('Create_CSV_table'))
This I did in the file content field.
Conclusion
To recap, in this post I demonstrated how you can use Power BI and Power Automate working together to create a solution that simply couldn't be done by using just one of those tools. I was able to use Power BI's reporting capabilities to prepare the data, then Power Automate to manipulate the data and create the output file, and finally SharePoint to host the data and make it available externally.
In my next post, I'll be describing the final process of how I created the SharePoint location and made it available to external users.
I believe this highlights the power of the Power Platform. The truth is there is no limit to what can be achieved when using these tools working together. I hope you agree. If you'd like to be notified of similar blog posts, you can sign up to my newsletter below.